Homemade Reese’s Cups with Vanilla Filling
Highlighted under: Cozy Favorites
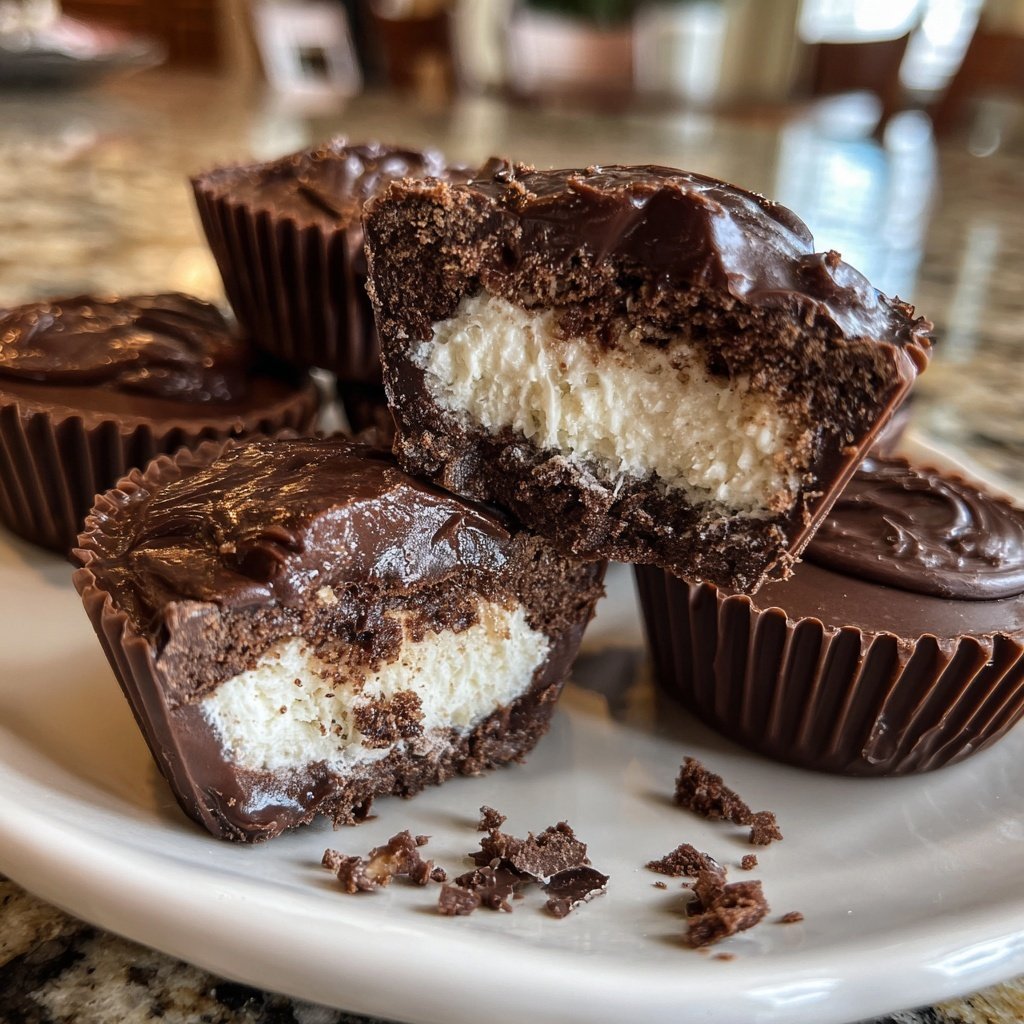
I absolutely love making these Homemade Reese’s Cups with Vanilla Filling! Whenever I have a craving for a sweet chocolate treat, this recipe always comes to my rescue. The combination of rich chocolate and creamy vanilla filling is simply irresistible. Plus, making them at home allows me to adjust the sweetness to my liking. I can share them with friends and family, and they never fail to impress. With just a few ingredients and a bit of time, I can whip up a delightful indulgence that feels gourmet.
When I first tried making these cups, I was amazed at how simple the process is. I used high-quality chocolate and made sure not to overheat it, which usually helps in achieving that perfect smooth texture. The vanilla filling was a delightful surprise; it added a wonderful creaminess without overpowering the classic chocolate flavor.
I've tried various methods, but I've found that letting the chocolate set in the fridge for a bit before adding the filling leads to a better overall texture. I've taken this recipe to gatherings and it always steals the show. Trust me, you’ll want to keep this recipe handy!
Why You'll Love This Recipe
- Decadent chocolate exterior that perfectly contrasts with a sweet vanilla filling
- Customizable sweetness allows you to create the perfect flavor balance
- Fun for all ages, making it a great activity to do with family or friends
Understanding the Chocolate
The foundation of these Homemade Reese’s Cups lies in the chocolate. Using high-quality semi-sweet chocolate chips is crucial, as they provide a rich flavor profile that complements the sweetness of the filling. When melting the chocolate and butter together in a double boiler, maintain a low heat to prevent burning. The chocolate should become glossy and smooth, indicating it’s ready for layering. If you notice any graininess, it’s likely been overheated; stir in a small amount of vegetable oil to smooth it out.
Alternatively, dark chocolate could be used for a more intense flavor, while milk chocolate would create a sweeter cup. If you're aiming for a dairy-free option, ensure you select vegan chocolate chips. Just be careful with the melting process: vegan chocolate can behave differently, so keep an eye on it to avoid seizing.
Perfecting the Filling
The peanut butter filling is where you can really customize these cups. I recommend using a creamy peanut butter for a smooth texture that spreads easily and melds beautifully with the chocolate. Natural peanut butter can work as well, but it might alter the consistency, making the filling slightly more runny. The addition of powdered sugar not only sweetens the filling but also helps to stabilize it, giving it a thicker consistency that holds up when layered.
For those who may have nut allergies, sunflower seed butter or soy nut butter can serve as excellent substitutes, providing a similar creamy texture without the allergens. Adjusting the amounts of powdered sugar or vanilla extract can also help you achieve your desired sweetness and flavor balance. I always taste the filling as I go to ensure it’s just right!
Tips for Layering and Setting
Layering is the fun part, and it’s important to allow each layer to set properly for the best results. After pouring the initial layer of chocolate into the cupcake liners, tap the trays gently on the counter to eliminate any air bubbles and ensure an even layer. Allow the chocolate to cool slightly but not harden completely before adding the filling. This will allow the two layers to bond better once set. If you miss this timing, the filling can slip during the next layer.
Once you've completed the layers, chilling in the refrigerator is essential. While 15 minutes is typically enough for the chocolate to firm up, consider leaving them for longer if you want a firmer bite. To store any leftovers, simply keep them in an airtight container in the fridge for up to a week, or freeze them for up to three months, making them a perfect make-ahead treat.
Ingredients
Gather these ingredients to create your delicious Homemade Reese’s Cups with Vanilla Filling.
Chocolate and Filling Ingredients
- 1 cup creamy peanut butter
- 2 cups semi-sweet chocolate chips
- 1 cup powdered sugar
- 1 teaspoon vanilla extract
- 1/4 cup unsalted butter
With these simple ingredients, you’ll be ready to create a delightful treat!
Instructions
Follow these steps to make your own Homemade Reese’s Cups with Vanilla Filling.
Prepare the Chocolate
Melt the chocolate chips and butter together in a double boiler over low heat, stirring constantly until smooth.
Make the Filling
In a separate bowl, mix the peanut butter, powdered sugar, and vanilla extract until smooth.
Layer the Ingredients
Pour a small amount of melted chocolate into cupcake liners to cover the bottom. Follow with a spoonful of the peanut butter filling, and top with more melted chocolate.
Let it Set
Refrigerate the cups for about 15 minutes, or until the chocolate is firm.
Once set, enjoy your Homemade Reese’s Cups!

Pro Tips
- For an extra touch, try adding a sprinkle of sea salt on top before refrigerating for a delightful contrast.
Serving Suggestions
These Homemade Reese’s Cups can be enjoyed in numerous ways. You can serve them as delightful after-dinner treats, or package them in decorative bags for gifts or party favors. If you’re feeling indulgent, you might consider drizzling melted chocolate or caramel over the top before they set, adding an extra layer of deliciousness. For a themed event, try incorporating them into dessert platters alongside brownies and cookies.
When serving, consider pairing them with a glass of cold milk or even a scoop of vanilla ice cream. The contrast of the cold dessert with the sweet, creamy cups adds an exciting temperature dimension that enhances the overall experience.
Variations to Try
If you want to experiment with flavors, consider adding toppings such as crushed nuts, sea salt, or even a hint of cinnamon to the filling before layering. These small additions can elevate the flavor profile and provide interesting texture contrasts. For a seasonal twist, try incorporating peppermint extract for a refreshing take around the holidays, or orange zest for a citrusy version.
You can also create different sized cups according to your preference by changing the size of your cupcake liners. Mini liners work beautifully for bite-sized treats, while larger liners can be used for a more dessert-like experience. Just remember to adjust the amount of chocolate and filling accordingly!
Troubleshooting Common Issues
One common issue is the chocolate hardening too much during the melting process, making it difficult to layer. If this happens, simply add a teaspoon of coconut oil or vegetable oil and stir until smooth. If the filling is too runny, add a bit more powdered sugar, which will help thicken it without compromising the flavor. It's all about finding the right balance for your ingredients.
Additionally, if your finished cups aren't coming out of the liners easily, consider using parchment paper liners next time. They offer non-stick properties that help remove the cups cleanly after they’ve set, avoiding any frustration during serving.
Questions About Recipes
→ Can I use milk chocolate instead of semi-sweet?
Yes, using milk chocolate will give a sweeter flavor to the cups.
→ How long can I store these Reese’s cups?
They can be kept in an airtight container for up to two weeks in the refrigerator.
→ Can I make these vegan?
Absolutely! Substitute the chocolate and butter with vegan alternatives.
→ What can I use instead of peanut butter?
Almond butter or sun butter are excellent substitutes for those with allergies.
Homemade Reese’s Cups with Vanilla Filling
What You'll Need
Chocolate and Filling Ingredients
- 1 cup creamy peanut butter
- 2 cups semi-sweet chocolate chips
- 1 cup powdered sugar
- 1 teaspoon vanilla extract
- 1/4 cup unsalted butter
How-To Steps
Melt the chocolate chips and butter together in a double boiler over low heat, stirring constantly until smooth.
In a separate bowl, mix the peanut butter, powdered sugar, and vanilla extract until smooth.
Pour a small amount of melted chocolate into cupcake liners to cover the bottom. Follow with a spoonful of the peanut butter filling, and top with more melted chocolate.
Refrigerate the cups for about 15 minutes, or until the chocolate is firm.
Extra Tips
- For an extra touch, try adding a sprinkle of sea salt on top before refrigerating for a delightful contrast.
Nutritional Breakdown (Per Serving)
- Calories: 150 kcal
- Total Fat: 10g
- Saturated Fat: 4g
- Cholesterol: 10mg
- Sodium: 50mg
- Total Carbohydrates: 14g
- Dietary Fiber: 1g
- Sugars: 8g
- Protein: 3g